I mentioned in my introduction to Cricut Explore Air, I knew right away that many crafting projects were going to be possible – but needed to start simple. So for one of my first projects I made simple iron on letters for a burlap banner. My next project was just as simple and I have a tutorial for you so you can get cutting with Cricut too!

The Cricut Design Space provides you with a catalog of thousands of pre made projects and images. For my niece’s bridal shower tea party I knew I wanted to make simple favors with a vinyl detail. I had ordered these tin boxes to place tea bags inside. All the box needed was a pretty flower detail. Here is how I added that vinyl image.
Cutting a Simple Pre-Made Image for Vinyl on Cricut Explore Air
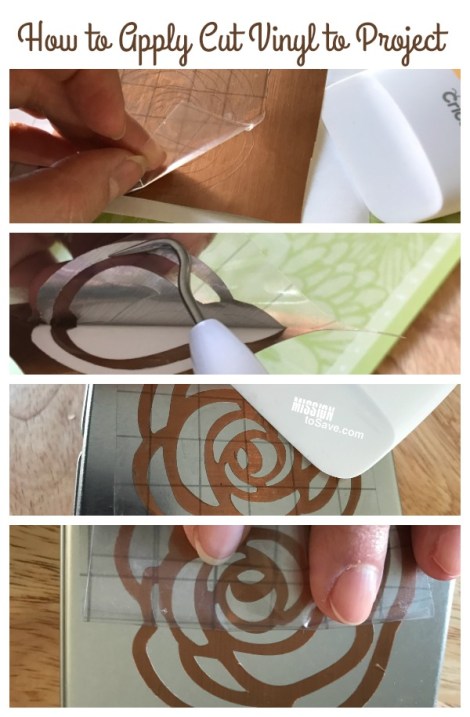
How to Apply Cut Vinyl to Project
- Go to Cricut Design Space
- Choose from one of the pre-made projects OR Click Create New Project (this is what I did to create a simple single image)
- On the Project editor page, click “Insert Images”
- Enter a search term to find your image.
- Note that there are several options on each image: Free, “a” which means free for access accounts or a purchase price.
- Click image to highlight, then click “insert images” on lower right.
- Drag image to upper right corner and resize for your application.
- Edit image- I chose to “hide” the background color so that I was just using one vinyl color for the image.
- Click Go and Go again.
- Be sure that settings are correct on your Explore Air, load and Go!
- Watch the video for a step by step
Now that your simple image has been cut, you need to know how to apply the vinyl to your project. For this you will need Cricut® Transfer Tape. This will help you get all those little pieces of you cut image in just the right place.

- First cut piece of transfer tape to size of image.
- Remove paper back of tape and apply sticky side to front of vinyl image
- Patiently remove image by leaving positive image on the transfer tape – “weeding” out the negative image.
- Apply vinyl to project piece and slowly remove transfer tape (fold tape back on itself and pull away on angle)
- (you can see the picture below has a little different image, but the process is the same)

So what was your first Cricut project? Haven’t tried one yet? Does this inspire you?


 I am on a mission to help you save. Join me on this frugal living mission and together we will learn how to save more, so we can do more living and give more too!


